|
  

Canopy Latch
Running Total Hours:
0.0
 | 2008.02.01:
(0.0) I decided to
use the after-market "Attaway" canopy latch [at
Attaway Air] [at
Fairings, Etc.] instead of the stock Van's design.
Why? Firstly, Van's latch looks and feels cheesy to me.
It's made of 1/8" thick sheet aluminum, has a "clown
nose" plastic ball for an interior handle, and a compression
spring that gets bent out of shape against the fuselage. On the
exterior side, it is actuated with two tabs that are always hanging
out in the breeze making drag. I'll concede that in this
instance Van's design is light, simple, and it does work. But
the look and feel of it really just isn't very nice (shall we say
"unrefined"), and the drag seems wasteful.
The "Attaway" latch, designed by RV-6 builder Robbie
Attaway, is a variation on Van's design. The latching mechanism
works basically the same way, with very similar geometry. But
instead of 1/8" sheet metal it is machined from 5/8"
aluminum, making for something that feels more like a handle, and
doing away with the plastic ball. The compression spring is
replaced by an extension spring, improving the look and feel of the
latch, and making the whole fully-functional latch assembly
self-contained. Most notably though, the thicker material makes
it possible to replace the exterior tabs with a push-botton, making
the latch completely flush with the exterior skin, and saving a bit of
drag. It should be noted however that the Attaway latch is
heavier. No free lunch.
Robbie Attaway no longer sells these latches himself, but his friend
Bob Snedaker of Fairings,
Etc. now does (for about $80). Both these guys are very
friendly, and were happy to answer my many questions before I finally
ordered the latch from Bob.
A couple of months after ordering the latch, Bob still hadn't shipped
it because he didn't have any of the return springs, and was unable to
find them at his usual sources. He gave it a noble effort, but
finally I asked that he just send me the machined latch pieces and
forget about the spring, so I could start working on it and worry
about finding a spring later. Note that the springs he normally
uses are Primeline SP 9604: 2.4lb
extension spring 11/32" x 1-7/8" x 0.025", and at least at some
point in the past they were available at general hardware stores like
Lowe's. He finally found a source that carried them, but is
still out of stock at this time. Anyway, I ended up using the
same spring that's used in Van's aileron trim kit (C-626/VA-116). I found that
it works just right, and as a bonus that's one less different part
that I'll need to find or keep spares of.
When I finally received the latch (minus the spring), there was
another problem. The bolt holes were all drilled too big.
The hole diameters measured approx 0.030" greater than nominal,
which is quite a bit of slop. Yes, the parts are meant to be
able to rotate around the bolts, but with that much slop they
literally rattle around the bolts. I spoke with both Bob and
Robbie about this. Robbie confirmed that this wasn't
right. Bob ultimately didn't disagree, but still couldn't offer
a replacement because all the parts he already had on hand were like
that, and he wasn't about to machine a new batch (he did offer to take
it back for a refund). Bummer... But I decided that I
could turn that lemon into lemonade, and make some bushings. The
bushing idea actually worked out very nicely, better in fact than the
original bushing-less design. I made stainless steel bushings
that would be held tightly by the bolts between the mounting brackets,
and I reamed out the holes in the latch parts to the diameter of the
bushings with minimal clearance (actually, I reamed the holes to
nominal diameter, and I narrowed down the bushings to provide a slight
clearance). This scheme is nice not only because the latch parts
rotate very smoothly around the bushings with no extra slop, but also
because 1) the length of the bushings precisely controls the spread
between the angle brackets to achieve very tight clearances between
the handles and the openings, and 2) the bolts can be torqued down all
the way giving the entire structure substantial rigidity.
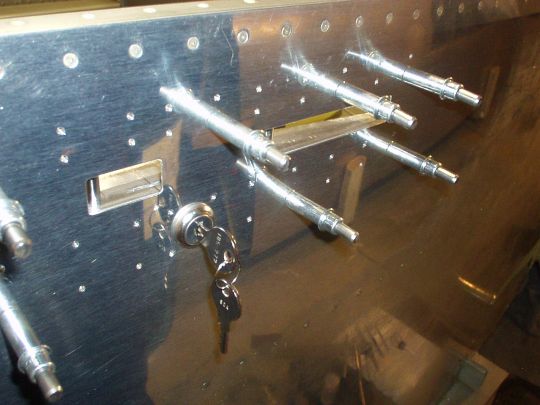
Key lock:
I decided to improvise another non-standard feature and add a key lock
to the canopy latch. This is also a controversial issue among
plane owners. Those against having a lock argue that if somebody
is going to steal your radios, you're better off making it easy for
him, so he doesn't have to break your canopy to get in. That's a
good argument. But by that same token, you can have a lock, and
choose whether to lock it or leave it unlocked on a case-by-case
basis, depending on time/place/cirumstances. That's the approach
I'm taking.
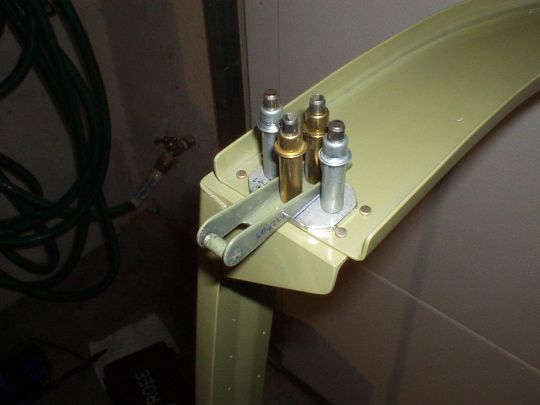
I worked out a simply design using a common 5/8" cam lock (the
kind used on office furniture, tool chests, public bathroom fixtures,
you name it, and incidentally most production piston aircraft) to
secure the canopy handle. Basically, in the locked position, the
cam (or "tongue") fits through a slot in the lower mounting
brakcet and up into a matching slot in the canopy handle. This
arrangement is actually very very strong, since the locking force is
essentially weaker of the shear strength of the cam tongue, or the
tensile strength of the mounting bracket or the canopy handle, all
very strong.
Now, these cam locks are more-or-less a generic commodity made and
sold by a large number of manufacturers and vendors. However,
while all very similar in design, the dimensions from one manufacturer
to another vary just enough to make them not interchangeable.
Argh... So I bought a few different ones and then selected the
one with dimensions that were most favorable for this latch. My
final pick was one made by National (now part of CompX), p/n N185-272
VKA825. These are available through McMaster-Carr, and also
locally at Marshall's.
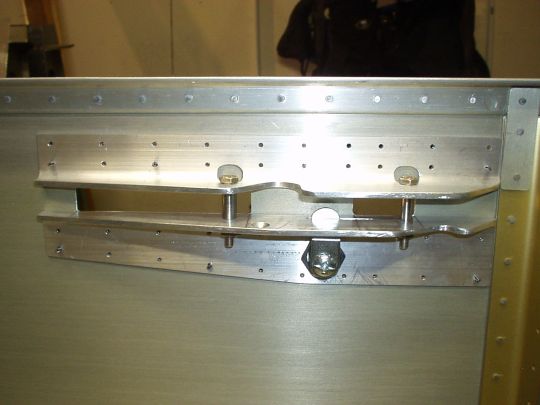 |
| 2008.06.26:
(0.0) Something I
didn't like about the Attaway latch design was that it uses the
airplane's skin as a spring. If things are fitted such that
normally the forward part of the aft handle sits flush on the interior
surface of the skin, then it has to actually push further into the
skin when the forward handle (i.e. the latch) is being moving in/out
of the latched position. That's the sort of over-centering
geometry that keeps everything secure in the closed position. It
works, but I didn't like putting that kind of stress on that small
area of the skin. It takes a lot of force, which doesn't feel
right, and I could anticipate that causing deformation or cracks in
the skin at the nearby rivets over time. So my solution was as
follows: 1. File down that surface of the aft handle so that it
has enough clearance throughout the full range of motion of the latch
to not put pressure on the skin. 2. Install a spring plunger at
the forward end that will put a controlled amount of pressure on the
skin to keep the handle in the nominal closed position. I used a
spring plunger from McMaster-Carr, p/n 84765A51. This particular
one has an initial force of 0.7 lbs. and a final force of 2.3 lbs,
which feels about right (I tried a few others, and this was my top
choice). It has a nice feel when operating the latch, and at
only 2.3 lbs. will not damage the skin. Simple refinement, great
result!
|
| 2008.12.11:
(0.0) For a few
months now I've had the latch mechanism all fabricated, fitted, and
sitting on the shelf waiting for a convenient time to install.
Well today Greg Larson came over to help me do some riveting on the
canopy frame, and since he still had some free time, we quickly also
riveted the latch brackets to the fuselage.
|
| 2008.12.31:
(0.0) Progress
update (working on this sporadically):
MECHANICAL ACTUATION
I adjusted the latch cams on the WD-617 torque tube weldment (which
came from Van's nowhere near symmetric) and I fit the latch lugs to
the canopy frame. One came out perfect and the other one for
some reason was off. But a second attempt with a replacement
part was also perfect. [Note that I did have to put 1/8"
shims between the canopy frame and the latch lugs to move them further
aft into position.] With this done, I get nice smooth action on
the torque tube, and good solid locking force with the bottom of the
side rails spaced 1/8" above the canopy deck.
I intend to attach plastic standoffs to the bottom of
the canopy frame aft angles that will rest against the F-757 gussets. That
way, the latch pressure will be directed there, rather than to the
back of the plexi against the roll bar. The standoffs will need
to be 0.352" tall. From top to bottom: 0.62" thickness
of the canopy frame side rail, 0.125" spacing from canopy frame
side rails to canopy deck, 0.040" thickness of the canopy deck,
0.125" thickness of the longeron.
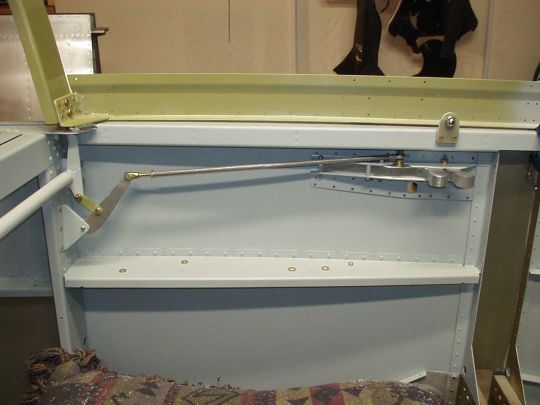
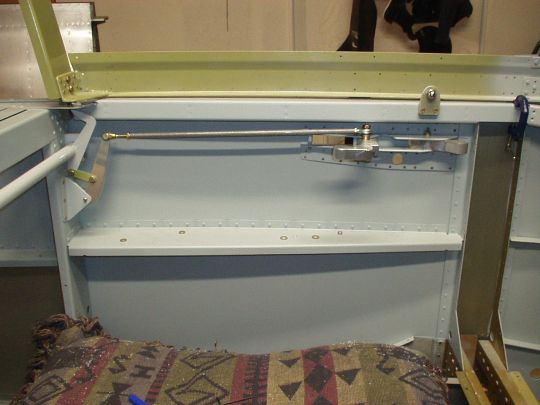
I fabricated the C-710 pushrod with slightly different dimensions than
shown on the plans to accomodate the modified latch handle. I
also used a CM-4M rod end bearing instead of CM-4MS, i.e. one without
a mounting stud. Instead, I will use an AN24-19 clevis bolt and
castle nut. I have to use a slotted head clevis bolt (inserted
from the bottom) rather than a standard hex head bolt because the
canopy latch handle is counterbored from the bottom for the bolt head
or nut, but not wide enough for a socket wrench or any other tool to
get a grip on a hex bolt head nut. A 3/8" spacer is also
needed between the canopy latch handle and the rod end bearing in
order for the pushrod to clear the latch handle's mounting bracket.
WARNING LIGHT
There have been several reports of pilots accidentally taking off
without properly latching the canopy. While the airplane is
still controllable in this condition, it is certainly an undesired
situation. Reportedly, at flight speeds, aerodynamic forces will
hold the canopy open several inches, and make it impossible to close
in flight. The pilot would be forced to return to the airport
and land in order to close the canopy. While this occurrence
shouldn't constitue an emergency, it does arguably compromise the
safety of flight, and could damage the airframe even if the pilot
handles the situation appropriately.
So, as an added safety measure, I decided to implement a "canopy
open" warning light (and/or audible warning, exact warning logic
and presentation TBD). In terms of sensing, I wanted to detect
that the canopy is both closed all the way AND latched. Now, the
canopy frame is sufficiently flexible that it can actually be closed
and latched on one side and not the other, so I decided to sense
closure on both sides.
I decided to use standard snap action switches (a.k.a. microswitches),
same as the one I used for the parking brake valve. Smaller form
factor switches may have made the installation easier due to the
cramped space, but the smaller switches are generally less robust
physically, and are also less standardized in form factor between
manufacturers. So in the interest of simplifying future
maintenance, I stuck with the standard switches.
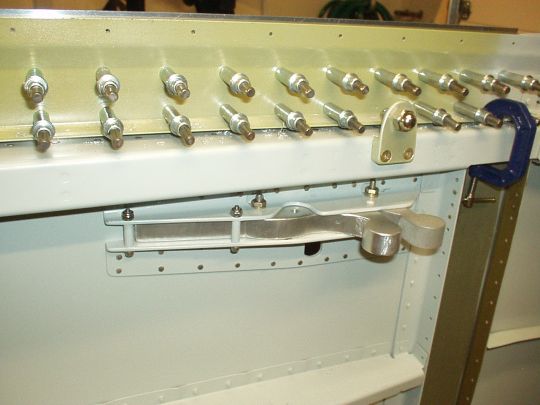
I played around with many possible geometries for mounting the
switches, and quickly narrowed it down to two:
The first approach involved three switches: one to detect full
closure of the canopy on each side, and one to detect that the latch
is in the engaged position on the right side only (since left and
right are on the same torque tube, actuated from the left). This
had the advantage of having all the switches mounted to fixed parts of
the airframe, but had the disadvantage of requiring the addition of
several non-trivial mounting brackets in an already cramped area.
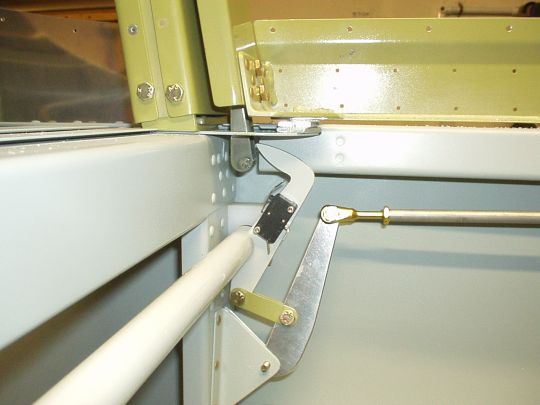
The second approach involved two switches only: one that detects
both that the canopy is fully closed and that the latch is actuated on
the left, and one likewise on the right. Basically, the switches
are mounted directly to the cam arms on the WD-617 weldment, and sense
that the canopy latch lugs are under the cam. This has the
advantage of using only two switches instead of three, and requires no
additional mouting brackets -- very clean installation. It does
however require that the lever arms on the switches be modified
slightly, and it does involve a wiring run from a moving part (the
WD-617) to a fixed part of the airframe.
I decided to go with the second approach. About modifying the
switches: I had to effectively widen the end of the lever arm to
ensure positive contact with the latch lug. I accomplished this
by attaching a 10/32" x 10/32" square of very thin stainless
steel sheet to the end of the lever arm. I used JB weld to glue
it -- seems very strong. I also needed to bend the arm back some
at the point just after it clears the casing of the switch. This
bend just made it so I could mount the switch body at a more
convenient angle relative to the WD-617 cam arm. I quickly
rigged it up, and it worked very well.
 |
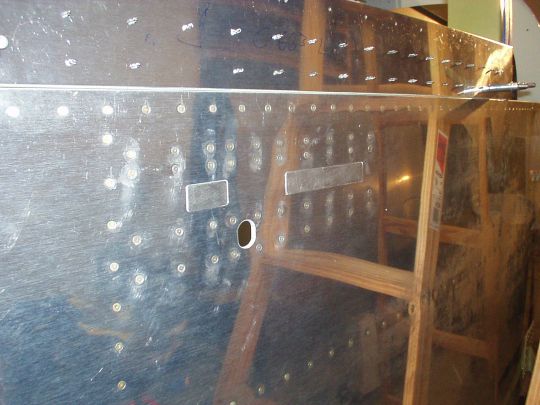
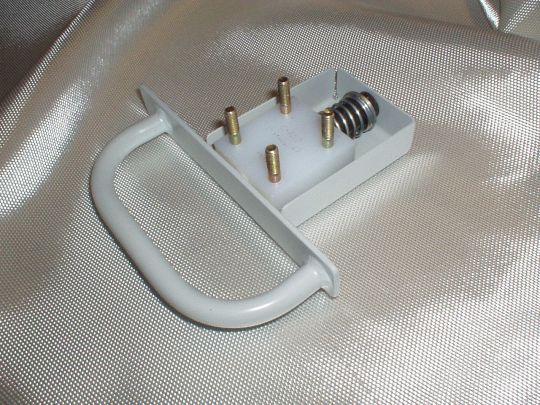
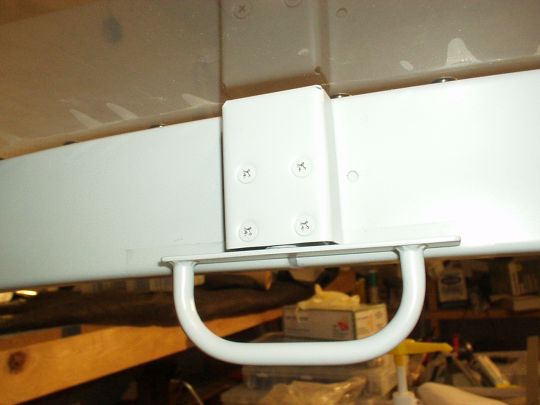
| 2009.12.19: (0.0)
The tip-up canopy incorporates a handle on the inside of the canopy
bow that also rotates under the cabin frame to double as a secondary
canopy safety latch, or rotated above the cabin frame to hold the
canopy slightly open. Nice little feature, but it needed a
little refinement. In the stock design, the handle rotates
freely inside a plastic bushing with no positive retention in any
particular position. So with vibration, etc. the handle can
rotate on its own accord. One very unfortunate scenario that has
actually occurred to at least two, is that upon closing the canopy
from the outside, the handle rotates slightly, thereby locking the
canopy closed from the inside. There is then no way to get at
the handle from outside the aircraft without cutting into
something. Tragic... To prevent this, I've decided to give
the handle some up-down freedom and spring-load it in the up position,
so that when unlocked, it can't freely rotate into the locked
position. It has to be forcibly pulled down past the bottom edge
of the canopy bow before it can be rotated. Not easy to explain,
but easy to see in the photos below. Note that I also fabricated
an aluminum box to cover up the mechanism. This serves several
purposes: 1. Keeps the spring from hitting the canopy glass if the
cotter pin ever fails, 2. Give me a surface I can paint gray like the
rest of the cockpit to minimize glare, 3. Clean aesthetics. Note
that I also put a coat of clear UHMW tape over the surfaces of the
canopy bow that the handle will rub.
 |
|
|
